Home » Best Practices for Robust Identity and Access Governance » Automated User Provisioning: A Comprehensive Guide for IT Teams
Automated User Provisioning: A Comprehensive Guide for IT Teams
Learn how automated user provisioning can effectively manage user identities across multiple systems and applications, with best practices and recommendations for implementation.
Explore the chapters:
- Chapter
- Identity and Access Governance
- Privileged Access Management Best Practices
- Identity Lifecycle Management
- Identity Governance and Administration
- Identity Governance Solutions
- Automated User Provisioning
- Access Governance Tools
- Federated Identity Access Management
- Vendor Privileged Access Management
- Identity Governance Framework
Stop AD Threats As They Happen
Cayosoft Protector provides continuous monitoring and real-time alerts across your entire Microsoft Identity stack
Like This Article?
Subscribe to our LinkedIn Newsletter to receive more educational content
With automated user provisioning, you can maintain user accounts and access permissions across systems and applications in accordance with rules set up in advance.
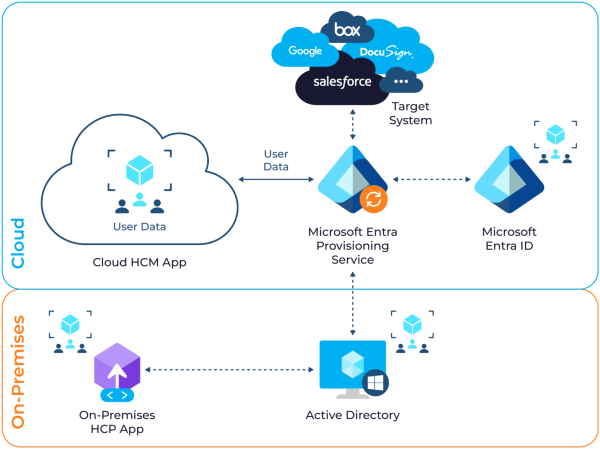
As your infrastructure footprint expands across cloud and hybrid environments, it becomes more challenging to manage user identities across dozens or even hundreds of systems. Automated user provisioning adds, updates, and deletes accounts across systems based on real-time changes in employee status by working with trusted data sources like human resources (HR) systems.
It also ensures consistent access controls, which significantly improve an organization’s security. Audit trails and policy enforcement lower the risk of noncompliance and eliminate repetitive manual tasks, reducing operating costs.
This article offers best practices and recommendations for implementing automated user provisioning systems, with a focus on effective user management strategies.
Summary of automated user provisioning best practices
| Best practices | Description |
|---|---|
| Define clear identity lifecycle policies | Plan processes for user creation, updates, and deactivation before implementing automation. |
| Integrate with authoritative truth sources | Discuss using systems like HR platforms as the trigger for event provisioning. |
| Standardize attribute mappings and transformations | Ensure consistency in identity attributes across applications. |
| Use group-based assignment and role-based access control | Automate access provisioning using dynamic groups and roles. |
| Monitor provisioning logs and error handling | Implement logging and alerting to catch and respond to failures. |
Manage, Monitor & Recover AD, Azure AD, Office 365

Unified Console
Use a single tool to administer and secure AD, Azure AD, and Office 365

Track Threats
Monitor AD for unwanted changes – detect for security or critical functions

Instant Recovery
Recover global enterprise-wide Active Directory forests in minutes, not days
Define clear identity lifecycle policies
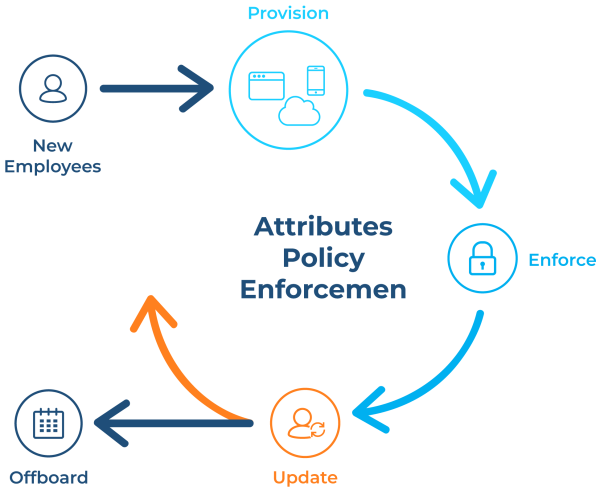
Automated provisioning works best when identity lifecycle policies align with business processes and technical needs. As a first step, organize your identity lifecycle around the three main stages of an employee lifecycle: onboarding, move, and offboarding. Changes in an employee’s status should trigger specific provisioning actions at each stage.
Onboarding phase
The onboarding phase includes all activities from the moment an employee accepts a job offer until they become fully productive. The system should:
- Create accounts in core systems
- Assign fundamental access rights based on role and department
- Provide standard applications required for the position.
Move phase
The move phase covers internal transfers, promotions, role changes, and temporary assignments. The provisioning system must modify existing access rights, add new permissions for the updated role, and remove access that is no longer appropriate. This phase often requires the most complex logic since it involves both additions and removals. Automation has to be reviewed and implemented regularly.
Offboarding phase
The offboarding phase includes terminations, resignations, and extended leave periods. The system should immediately disable or delete accounts in security-sensitive systems. However, it can preserve data access for legal or business continuity purposes, as outlined in retention policies.

Since the user’s employee lifecycle only serves as a framework or a guideline, each phase can vary for each organization. Feel free to define more phases to cater to your organization’s needs.
Integrate with authoritative truth sources
For automated user provisioning to work efficiently, data must be fetched from systems that are generally considered truth sources, such as enterprise HR information systems (HRIS). They maintain employee records, such as onboarding dates, job titles, department assignments, organizational relationships, and employment status.
There are many ways to integrate HRIS systems into the provisioning workflow, but consider connecting directly via an API. An Application Programming Interface (API) acts as a bridge or connection between two systems, providing real-time access to employee changes and reducing the risk of data synchronization delays. You can save time by avoiding manual data import and export.
Integration example
The script below is an example of how to call an API endpoint using PowerShell. However, since API collections vary between software, consult your HRIS API documentation before integration.
					$HRApiEndpoint = "https://api.hris.com/employees"
$Headers = @{
    'Authorization' = "Bearer $($env:HR_API_TOKEN)"
    'Content-Type' = 'application/json'
}

try {
    $Response = Invoke-RestMethod -Uri $HRApiEndpoint -Headers $Headers -Method Get
    Write-Output "HR system connection successful. Retrieved $($Response.employees.Count) employee records."
} catch {
    Write-Error "Failed to connect to HR system: $($_.Exception.Message)"
}
Synchronization methods
Once integrated, based on business requirements and technical capabilities, you can choose between the following synchronization methods.
- Real-time synchronization provides immediate provisioning responses to employee changes but requires more robust error handling and system availability.
- Scheduled synchronization offers more predictable system load and easier troubleshooting, but introduces delays between employee changes and access updates. Most organizations find that hourly or daily synchronization meets their needs while maintaining system stability.
- Incremental synchronization, or delta synchronization, reduces system load and improves performance. Rather than processing all employee records during each sync, the system only identifies changed entries since the last synchronization.
| Sync type | Advantages | Disadvantages | Best For |
|---|---|---|---|
| Real-time | Immediate provisioning, better user experience | Higher system load, complex error handling | High-security environments, executive users |
| Hourly | Balance of timeliness and performance | Some delay in provisioning | Most standard business environments |
| Daily | Predictable system load, easier maintenance | Significant provisioning delays | Low-change environments, batch-oriented systems |
If you are not familiar with performing integrations between two systems, the good thing is that there are solutions in the market that do the synchronization for you. One good example is Cayosoft Administrator, which can directly interface with HR information systems, such as Workday, and accept sync methods using databases like Oracle and SQL, as well as simple flat files in CSV format.
Manage, Monitor & Recover AD, Azure AD, M365, Teams
| Platform | Admin Features | Single Console for Hybrid (On-prem AD, Azure AD, M365, Teams) | Change Monitoring & Auditing | User Governance (Roles, Rules, Automation) | Forest Recovery in Minutes |
| Microsoft AD Native Tools | ✓ | ||||
| Microsoft AD + Cayosoft | ✓ | ✓ | ✓ | ✓ | ✓ |
Standardize attribute mappings and transformations
Standardized attribute mapping ensures the smooth flow of employee information from source systems to target applications. They reduce the complexity of setting up and errors that may lead to failed provisioning or security gaps.
The best way to standardize attribute mappings throughout the organization is through the System for Cross-domain Identity Management (SCIM) protocol. The SCIM protocol has a standardized means to automate user provisioning between application systems and platforms. It outlines agreed-upon user attributes and provisioning actions that act predictably among vendors.
SCIM support varies among applications, with most modern cloud platforms providing native SCIM endpoints. Applications with SCIM support can receive user updates through standardized API calls rather than vendor-specific integration methods.

SCIM requires you to identify essential employee attributes that most of your applications require and create standardized mappings for these fields. Document attribute mapping decisions and maintain them in a central configuration repository. This documentation helps system administrators (and developers) understand how data flows between systems and simplifies troubleshooting when provisioning issues occur.
Here is an example mapping:
| HR system attribute | Standardized attribute | Target application usage |
|---|---|---|
| emp_id | employeeNumber | Unique identifier across all systems |
| first_name | givenName | Display names, email generation |
| last_name | familyName | Display names, email generation |
| work_email | emailAddress | Primary communication, login identifier |
| dept_code | contactDepartment | Access control, application assignment |
| mgr_emp_id | reportingManager | Approval workflows and organizational hierarchy |
| job_title | jobTitle | Role-based permissions, directory listings |
| site_code | siteLocation | Country or location-based mapping. |
When your organization grows, more attributes may be added for ease of directory management. With increased attributes, managing SCIM and structures can lead to confusion, inconsistencies, and human error. Once you feel that managing SCIM attributes is getting more complex, let a solution that specializes in Active Directory management do it for you. One example of AD management solutions is Cayosoft Administrator, which can create, delete, and track all updates to all attributes that you have changed over time.
Learn About The First-Ever Monitoring and Rollback for Microsoft Intune
Use group-based assignment and role-based access control (RBAC)
Group-based assignment and role-based access control (RBAC) are scalable approaches to controlling user access to numerous resources and applications. You can automatically assign users to groups based on employee information, such as department, job title, location, or employment type. Dynamic assignment minimizes manual intervention and maintains access patterns among similar users. Users have the right level of access based on organizational roles and responsibilities, while also saving administrative costs.
Create groupings with already-established name conventions that mirror standard use patterns rather than organization structure in isolation. As an example, define groupings like “Sales-CRM-Users” or “Finance-ERP-ReadOnly” that combine organizational type with application requirement.
Make use of nested group structure to ease complicated access needs. Parent groups may hold child groups, allowing administrators to provide wide access in light of parent group membership while still maintaining fine-grained control over child group assignments.
You can use standardized mappings to perform a dynamic group membership process. The PowerShell script below checks the user’s attributes, including department, location, and job title. If the attributes match, the user is added to the specified groups.
					function Set-DynamicGroupMembership {
    param(
        [Parameter(Mandatory=$true)]$Employee,
        [Parameter(Mandatory=$true)]$GroupMappings
    )

    $AssignedGroups = @()

    # Department-based group assignment
    if ($GroupMappings.Department.ContainsKey($Employee.contactDepartment)) {
        $AssignedGroups += $GroupMappings.Department[$Employee.contactDepartment]
    }

    # Location-based group assignment
    if ($GroupMappings.Location.ContainsKey($Employee.siteLocation)) {
        $AssignedGroups += $GroupMappings.Location[$Employee.siteLocation]
    }

    # Role-based group assignment
    if ($GroupMappings.Role.ContainsKey($Employee.jobTitle)) {
        $AssignedGroups += $GroupMappings.Role[$Employee.jobTitle]
    }

    return $AssignedGroups | Sort-Object | Get-Unique
}

# Define group mappings
$GroupMappings = @{
    Department = @{
        "Sales" = @("Sales-CRM-Users", "Sales-Reporting-Viewers")
        "Finance" = @("Finance-ERP-Users", "Finance-BI-Viewers")
        "Engineering" = @("Dev-Tools-Users", "Code-Repository-Contributors")
    }
    Location = @{
        "New York" = @("NY-Office-Resources", "Eastern-Timezone-Users")
        "London" = @("London-Office-Resources", "European-Users")
    }
    Role = @{
        "Sales Manager" = @("Sales-Management-Tools", "Sales-Reports-Full")
        "Software Engineer" = @("Development-Environment", "Source-Control")
    }
}

# Perform group based dynamic join from here
If the scripting method presented above seems too taxing, there are multiple third-party solutions that offer graphical dashboards for group assignment. One example is Cayosoft Administrator, which can dynamically provision the creation and assignment of groups.

Monitor provisioning logs and error handling
Detailed logging lets you track all provisioning events, including successful operations, failures, and system changes. Widescale logging and monitoring ensure that automatically provisioned systems run reliably and provide visibility into organizational access changes. You can detect and troubleshoot issues at speed, while facilitating compliance and audit requirements.
Logs should capture sufficient information to recreate the decision-making process for each provisioning action. For example, you can capture the timestamp, user ID, source system trigger, target application, action taken, and result status. Other information, such as employee department, manager, and job title, helps administrators gain background business information to guide their provisioning decisions.
Finally, structure log entries in a uniform format that supports automated analysis and alerting. Use structured logging formats like JSON that are easy to search and filter through large quantities of provisioning events.
The script below shows an example of how to generate a simple user provisioning log with an output of JSON.
					# Example PowerShell function for structured provisioning logging
function Write-ProvisioningLog {
    param(
        [Parameter(Mandatory=$true)]$UserId,
        [Parameter(Mandatory=$true)]$Action,
        [Parameter(Mandatory=$true)]$TargetSystem,
        [Parameter(Mandatory=$true)]$Status,
        $Details = @{},
        $Error = $null
    )

    $LogEntry = @{
        timestamp = (Get-Date -Format "yyyy-MM-ddTHH:mm:ss.fffZ")
        userId = $UserId
        action = $Action
        targetSystem = $TargetSystem
        status = $Status
        details = $Details
        error = if ($Error) { $Error.ToString() } else { $null }
        sessionId = $env:PROVISIONING_SESSION_ID
    }

    $LogJson = $LogEntry | ConvertTo-Json -Compress
    Write-Output $LogJson | Out-File -Append -FilePath $env:PROVISIONING_LOG_PATH

    # Send to centralized logging system if configured
    if ($env:LOG_ANALYTICS_ENDPOINT) {
        try {
            Invoke-RestMethod -Uri $env:LOG_ANALYTICS_ENDPOINT -Method Post -Body $LogJson -ContentType "application/json"
        } catch {
            Write-Warning "Failed to send log to central system: $($_.Exception.Message)"
        }
    }
}

# Usage example
Write-ProvisioningLog -UserId "john.doe@company.com" -Action "Create User" -TargetSystem "Office 365" -Status "Success" -Details @{
    department = "Sales"
    jobTitle = "Account Executive"
    groups = @("Sales-CRM-Users", "Office365-Standard")
}
Maintaining and provisioning logs can be tiresome, especially when the organization that you support grows in number after a specific period of time. If that is the case, it is better to centralize all logs in one location. Microsoft offers specific tools to address this problem, such as sending events to Azure Data Explorer. Alternatively, you can use a comprehensive, all-in-one Active Directory management solution like Cayosoft Administrator, which provides centralized logging of all administrative actions performed through the platform, allowing you to manage and audit AD activity from a single interface.
Watch a 15-minute Demo of Microsoft Intune Change Monitoring and Recovery
Conclusion
As identity systems integrate with cloud platforms and hybrid directories, complexity increases. Automated provisioning must therefore account for interdependencies across environments, changes in compliance requirements, and variations in access control policies.
Cayosoft provides purpose-built automation and governance tools that help enterprises manage hybrid identity systems with precision. Through centralized policy control, real-time monitoring, and audit-ready reporting, Cayosoft enables organizations to maintain the consistency, security, and adaptability required for effective automated user provisioning.
To know more about how Cayosoft’s automation engine can help you save hours of manual work every week, book a demo here.
Stop AD Threats As They Happen
Cayosoft Protector provides continuous monitoring and real-time alerts across your entire Microsoft Identity stack
Like This Article?
Subscribe to our LinkedIn Newsletter to receive more educational content